Tuesday, September 30, 2008

Tuesday Tips *Color Core Cardstock & Dry Emobssing*

Just found my two new found loves
1.)Color Core Cardstock and
2.)Quickutz Embossing Dies
Let me show you why.

Supplies used in this demo:
Black Magic - core'dinations color core cardstock
Quickutz Revolution with Embossing Mat
Quickutz Embossing Die - Swirls
Basic Grey- Precision File Tools
Extra sheets of pattern paper.


First of all I have to say...Love this paper. Has the texture of Bazzill but it is black on one side and colored on the other. There is another pack of paper that has kraft on one side and the color on the other. These do come in packs so get them while you can.

First I cut up the cardstock into little strips just for demo purposes.

(As you can see the pink is the core color of the paper.)


I placed the cardstock in the embossing die.


Then I closed the embossing die and placed it on my revolution platform and put the embossing mat down.
I like an extra deep embossed look. To make it a little deeper I added a sheet of pattern paper on top of the embossing mat to give the extra pressure to the die.

Then I took the embossing die off the platform and this is what you get.


This is what the cardstock looks like after you take it out of the embossing die.

Next I took the sanding block and sanded the raised part of the cardstock. As you see, the black side is the only one that gives the two tone look. ( I wanted to see if the black would show up on the pink side...answer is NO.)


Here is the cardstock sanded and a beautiful two tone look.


Just remember, the core color is what will show through when sanding the embossed image. If your cardstock is the same color all the way through you will not get the same effect. (Bazzill cardstock is the same color all the way through.) This is why I like the Black Magic core'dinations paper. I will have my samples up in the store for you to see the texture and effect you close.

Sorry for the short post. I have a house full of sick kids, including myself, so stay healthy until next week. Create and have fun.

:)sesil

Sunday, September 28, 2008

Scrappin On Sundays

Hello everyone,

Here is your SOS for this Sunday, September 28th, 2008...

Can not believe that we have said "Goodbye" to summer and "Hello" to fall over the past few days.
We are getting in gear for the Holiday Season at Windy City Scrapbooking as Halloween will be here soon and so will the other Holidays that follow...make sure you stop by to see all of the cool Halloween products and be looking out for Sesil and Melissa to make Halloween projects part of their "Tuesday's Tip" and " Full Circle Friday"

This week for classes, I will be debuting my Create L.O.V.E. class in which you will learn how to Create Lay Outs Very Easy and Angie will be bringing back her Altered Envelope class and Jen will debut her Home Mini Book...just give us a call and register your.

There is a crop this Friday, October 3rd and we do have spots available...I have personally noticed that once the air gets cool, scrapbookers tend to spend more time indoors actually scrapbooking and going to crops are a great way to get a block of interrupted time to work on your layouts and projects..

Now we have actually made things easy for you as we have our calendar available for the months of October and November available on our website so you may plan your shopping trips, crop nights, classes, etc

Do not forget about our huge Quickutz promotion that Susan posted about last week...you always know when we are making room for NEW with any type of promotions that we have.

Here is to a great week...Enjoy

TTFN
Alraynita

Friday, September 26, 2008

Full Circle Friday

Greetings! For today's sketch we are working with 3 4x6 photos... no enlargements or smaller prints. A couple of those photos will get trimmed but start with 4x6 photos. The challenging part is fitting 3 4x6 photos on a 8.5x11 layout! It can be done. If you want to add more embellishment just convert the sketch to 12x12, keep all the photo sizes the same, and shift all the elements to the left or the right of the layout.


You will notice some flowers in the sketch. That doesn't mean you have to use flowers, that is just my way of denoting an embellishment. In my completed layout you will notice the "flowers" in the sketch turned into unicorn rub ons.


Supplies:


Bazzill Cardstock
Maya Road Maya Mists
American Craft Thickers
Maya Road Rub Ons
Heidi Swapp Bling
EK Success 1.25" Circle Punch
Micron Pen


Supplies from my Stash:

Scrap paper
Heidi Swapp Flower Mask


I have a major problem in my scrap space... I have way too much scrap paper. All those papers the get cut off and unused from a prior project do have a home in my space but my drawers are getting VERY full. One of my current goals is to use my scraps more. For this project I matted each photo in a different patterned paper scrap. The only thing that unifies these scrap papers is that they all have a dark pink in them. The patterned or theme didn't matter to me.

I tried a new product and technique as well. The new Maya Mists are so much fun. I dug out an old Heidi Swapp mask and placed that on my blank white cardstock. Then I started playing with the mist. You don't need to have a HS mask to make a cool image with the spray. Use any die cut or sticker you can easily peel off. I may even try leaves and small branches from outside on a future fall project.

I do have one tip for the Maya Mists... if you can, take the project outside to spray! Either that or have a large protector covering your table/surface. I got a little carried away and sprayed a little on my rug. (At least it was just my scrap room rug! That thing gets all kinds of crafting abuse... burned with the heat gun, etc.) Don't let this scare you, just properly prepare your work space first. Maya Mists are a lot of fun!


You Go Girl!
I just wanted to take a second to post a link to a layout inspired by a past Full Circle Friday by Alexandra M. You Rock Alexandra! I love how you stitched in the title.


Okay, Now It's Your Turn!
Want to be published on our blog? This is your chance to let your creative genius shine! (It's there even if you don't believe it, trust me!) Send us a completed layout using this 12x12 sketch as inspiration and have your creation posted in the Full Circle Friday for Friday, October 17, 2008. All complete entires following the described guidelines will be posted!

Email a scan or clear photograph no larger than 500k to classes@windycityscrapbooking.com along with your name and supply list. Layouts can be 12x12 or a different size. We will not publish any content that we decide is inappropriate or vulgar. Entries are due Wednesday, October 15, 2008.

I can't wait to see what you come up with!

Thursday, September 25, 2008

Happy Thursday!

So if you have not heard this weekend is our event for Scrap Pink! We still have a few spots left for Saturday and Sunday crops!

This week we have been busy putting out new product again!
Here are some of the items we have been lucky enough to put out!

Kimberley Poloson-This is another company by Fiskars! We got in beautiful wedding papers, the line is called Blooming Love!(Heritage, Anniversary you name it!) Papers, rub ons and stickers!

We also put out the Brand new QuicKutz! Come on in and get started on all of your holiday cards!
Speaking of QuicKutz have you heard about our sale going on???
If not here you go! This special is good until October 4th! And don't forget all the clearance dies too!
All 20 shapes, alphabets, and border dies that are featured in the new school idea book are 40% off (unless they are already on clearance which will be a better price!)

Metro SkinniMini CLEARANCE $29.99, Regular $69.99
Studio Classic 2x4 CLEARANCE $69.99,
Regular $169.99

Apple SALE $4.19, Regular $6.99
Photo Corners SALE $4.19, Regular $6.99

Crayons SALE $10.19, Regular $16.99
Pencil SALE $10.19, Regular $16.99
Tabs SALE $10.19, Regular $16.99

Nesting Circles SALE $14.99, Regular $24.99
Nesting Flowers SALE $14.99, Regular $24.99
Scallops Border SALE $14.99, Regular $24.99

Aquarius Mini 4x8 SALE $23.99, Regular $39.99
Moonlight SkinniMini 4x8 SALE $23.99, Regular $39.99
Chocolate Mini 4x8 SALE $23.99, Regular $39.99
Chemistry Mini 4x8 SALE $23.99, Regular $39.99
Rollerskate SkinniMini 4x8 SALE $23.99,
Regular $39.99

Chicago Classic SALE $59.99, Regular $99.99
Blossom Classic SALE $59.99, Regular $99.99

Nutmeg Classic SALE $71.99, Regular $119.99
University Grand SALE $77.99, Regular $129.99
Studio Classic 2x2 SALE $119.99, Regular $199.99

Applies to in-stock merchandise only, no additional discounts apply

These are just a few of the goodies--come see us over the weekend to see what else is new!

Have a great weekend-
Susan

Tuesday, September 23, 2008

Winner for Tuesday Tips is....

Sylvia !!!! Girl you rock! I will have a box of goodies for you at the store on Thursday night when I come in to work. Trust me...it is a great stash of scrapbooking stuff. :)

Okay..please forgive me I will post Tuesday Tip later tonight. I broke my camera July 4th and now I am sharing a camera with my husband. He took it into work today and I have to wait for him to come home to take pictures. Just not a good tip if there are no visuals.
So please accept my apologies. See you soon. :)Sesil

Sunday, September 21, 2008

Scrapping On Sundays...

Wow...we have had a great full week at Windy City Scrapbooking, not only at the store but on our blog as well
We are just gearing up to get all of our Windy City Scrappers ready for all of your scrapping needs, no matter how large or small your project may be.
I am totally loving Full Circle Friday and Tuesday Tips are awesome too...make sure to post your entry for Sesil's Blog Prize by tomorrow, September 22nd...I have seen her stash first hand and you are guaranteed to get some goodies...Hey Sesil...are employees eligible for your contest too...LOL

Anywhoo
Here is your SOS for this Sunday, September 21st, 2008

For classes this week, I will be teaching Beyond the Basics on Tuesday evening at 6:30pm and Sesil will teaching Basics on Thursday evening at 6:30pm. Also...if you were not able to attend the Instructor Open House this past Saturday, make sure to check out our website at www.windycityscrapbooking.com/classes.htm to see all of our cool classes coming up this fall. Dates and prices are available and all you have to do is give us a call to register yourself for class or stop in.


This weekend is our Scrap Pink Event...
Come scrap with us us as we help fight against Breast Cancer! A portion of your crop fee will be donated to the Susan G. Komen Foundation.
Sign up for the whole weekend and get a $10.00 Gift Certificate to spend at Windy City Scrapbooking & a Scrap Pink T-shirt if you sign up by September 7th!
Anyone cropping all weekend will receive a huge gift bag as well!
There will be raffles all day Saturday!
If you sign up for the whole weekend you can leave all your stuff at Windy City and you can have your same seat!
First come, first serve on seating!
Friday, September 26th 5:30-11:30 p.m. $15.00
Saturday, September 27th 10 a.m. until 11 p.m. $50.00
Sunday, September 28th 11 a.m.-5 p.m. $15.00
We are going to have a great time during the crop so call us to reserve your spot...I do believe there may be some slots still available
October and November crop dates are posted already on our web page so make sure to check our schedule and yours and come and crop with us

Do not forget the coupon available this week (which must be printed out) which is
September 18-23 , 2008 -- Buy any 10 sheets of patterned paper and get a free sticker alphabet from SEI Coupon valid on in-stock merchandise only and MUST BE PRESENTED at the time of sale. Other restrictions apply.
Also...do not forget our Wacky Wednesday Sale...this is the last one for the month of September

Now I know you may be wondering what is new in the store...and honestly, I have not been there since last Tuesday, so I am excited to see what is new as well so we hope to see you at the store.
If I am not mistaken, the new releases from Quickutz will be available this Tuesday and I have heard they are really cute.

Do not forget to post your entry for Sesil contest that ends tomorrow

Have a great week
TTFN
Alraynita

Friday, September 19, 2008

Full Circle Friday

Sorry Full Circle Friday is a little late today! My camera battery died this morning and I had to charge it before I could get my photos uploaded. Anyway, I am back in business.

This week's sketch pushed me outside of my comfortable creative box. The first creative stretch was working with a large circle. All of the elements of the layout fit nicely inside a circle; a bit different from the squares and rectangles in which scrapbookers usually work. The second is putting the title right over the top of the focal photo. Just keep telling yourself it is okay if you cover up part of your photograph.... it is, it really is okay. In my layout you will notice the cute chubby face and hand are perfectly visible while the busy patterned shirt is the part covered up by the title. The busy pattern was distracting anyway. The main focal photo is an uncropped 5x7 photo. It may look smaller in my finished layout just because I overlapped my accent photos and embellishments over the top of the focal photo. The small photos are 2.5x3.5. Then of course there is the giant circle and then a thin strip across horizontally to add stability to the entire design.


Supplies:
Luxe Designs: Sprinkles Collection patterned paper
Bazzill Cardstock
Maya Road Butterfly Chip Coaster
Me & My Big Ideas Butterfly Rhinestone sticker
Luxe Designs journaling sticker
ThermOWeb Zots and Glue Stick
Uniball Signo white pen
American Craft Slick Writer

Supplies from my personal stash:
American Crafts Thickers alpha stickers
Making Memories brads

For the giant circle I used the super extraordinary circle template.... a kitchen dinner plate. I traced it on the paper. Then I took a second smaller plate and traced that inside the bigger circle. Cut with fine-tip scissors. I also used the fine-tip scissors to cut out the circle patterns from one of my patterned papers. I love to cut out designs from pattern paper. Sometimes you love a paper but using the entire piece is too overwhelming for the layout. The smaller circle accents are scattered around the large circle and reinforce the whole circle theme.

I covered the butterfly chipboard with patterned paper. See Sesil's Tuesday Tip from this week to get detailed instructions on covering chipboard. To give the butterfly a little "pop" I outlined it with a white pen. The butterfly houses my journaling sticker, which if left by itself would be lost in the layout. The journaling sticker needed that butterfly to bring your attention to it.

As I mentioned before, the title is big and bold right across the focal photo. I used the rhinestone butterfly mostly because I thought it was cute. But it did help balance my big, bold title. Sometimes I just need a little bling!

As always you can adapt the 12x12 to a different size layout. And please post a link to your version of the sketch after you give it a try!

Thursday, September 18, 2008

Instructor Open House...

is this Saturday, September 20th! Come anytime between 11 a.m. and 1 p.m. to see what our amazing instructors have planned for this fall. You will be able to see their projects and do make & takes with them! Also you can sign up for their class that day and get a coupon just for talking with one of our AWESOME instructors! Get a jump start on your holiday shopping and see what you can make instead!


And then if you want to play stay for our meet up group until 5:00 pm and crop the afternoon away! Have questions about this weekend? Just email us at classes@windycityscrapbooking.com and we will get all of your questions answered!

I hope to see you on Saturday! And we still have some spaces left in our crop for Friday night! So grab you stuff, give us and call and get cropping!

Have a great weekend-Susan

Tuesday, September 16, 2008

Tuesday Tip *Chipboard Flower*

I have had some friends ask me how I alter my chipboard. Here is my step by step on how I alter chipboard by using pattern paper. There are many different ways to alter the chipboard but this is on of the easiest way to do it besides painting.


Supplies I am using for this project:

Maya Road Flower Petals Chipboard

My Minds Eye - Laundry Line glitter paper (as you see I am only using a strip of the paper. This is such a great way to use up all the scrap paper we have laying around)

Basic Gray- Precision File Set

Tonic Scissors

Ranger- Crackle paint

Therm o web - glue stick


First thing I like to do is get out my chipboard pieces and line them up to make sure I have enough scrap paper to cover all the pieces.


Next I take all the chipboard pieces and use the glue stick to cover one side of the chipboard then add to the back side of the pattern paper.

*Like my hand models? (this is Drew my little two year old helping me.)


Make sure all the edges are covered with your adhesive.
This is why I like to use a glue stick vs. a dry adhesive.


As you see here. I just glue everything down at the same time.


Then I cut out the chipboard from the pattern paper. You don't have to get that close to the chipboard because the next step will take care of the overlapping paper.


Next I take the file set and sand down the extra paper on the chipboard. I do sand in one direction..this prevents the paper from trying to lift off the chipboard. This gives it a slight distressed look to the chipboard.

*Drew did such a great job sanding down the pattern paper.


For the center piece, we took the crackle paint and just slapped it on to give it a simple coat of color.

*Sammie loves using the paint. Check out the nail polish.


Finally we have our completed flower pattern paper chipboard accent.

Come by the store to see the final project. I love the new Laundry line from My Mind's Eye. The pictures just don't do it justice. I would love to see your pattern pattern covered chipboard elements. Post a picture or link to your picture to this post and I will randomly pick a winner for a gift pack from my personal stash. Post pictures by Monday, Sept. 22nd and I will post the winners on next weeks Tuesday tips. See you next week. :)SESIL

Sunday, September 14, 2008

Scrapping On Sundays

Hey Everyone,

Here is your SOS for this Sunday, September 14, 2008
We have had a great week of receiving new products...as I stated last week, Maya Road is all in and thank you Susan for posting up photos for me.
I wonder what UPS will bring for us this week...

Our Wacky Wednesday for this week is for those of you who love LIVING the LUXE LIFE...
Buy 5 sheets of Luxe Paper and you will get one yard of Luxe Ribbon for FREE...buy 10 sheets and you will get 2 yards of Luxe Ribbon and so forth.

For classes this week, Sesil and I will both be teaching Basics and Jen will be teaching Tools of the Trade. This Saturday, September 20th, we will have our Instructor Open House from 11am-1pm. Here you will be able to meet our Instructors and preview what is coming up this fall for classes. This is a great event that you would not want to miss out on...the instructors will doing Make and Takes, answering questions and showcasing new classes and you will be able to receive a coupon to use to take classes and actually sign up for classes...Make sure to come by for the Open House.

There are a few spots left for the crop this Friday night...just give us a call to reserve your spot.

Check out our website to see what promotions we are doing this month for QuicKutz...

Here are the promotions valid through Saturday, September 20th, 2008!
All Cookie Cutter Shapes-Reg. $12.99--NOW $5.99!
All Nesting Dies-Reg. $24.99-- NOW $12.99!
All 2x2 Goosebumpz-Reg. $12.99 -- NOW $4.99!
All 4x4 Goosebumpz-Reg. $24.99-- NOW $9.99!
Purchase any of the above items during the promotional period you will receive a free idea book from QuicKutz while supplies last!Limit one per person.
**No additional discounts will apply to promotional items.
**Promotional prices limited to in-stock items only.


Hope to see you in the store soon
Have a great week and create something special

TTFN
Alraynita

Friday, September 12, 2008

Full Circle Friday

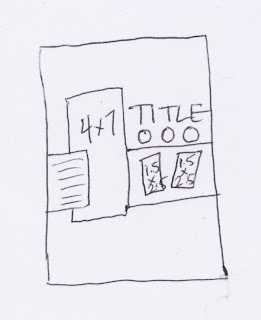
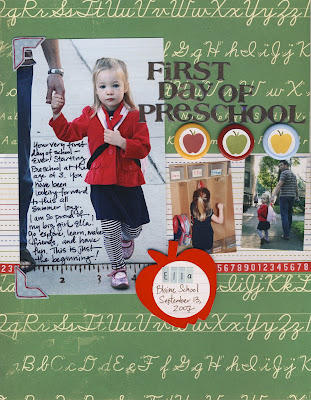
Our sketch this week is an 8.5 x 11, but as always, can be adapted for 12x12, 8x8 and so on. We are using 3 photos. One large focal photo and two smaller accent photos. For the focal photo start with a 5x7 and trim an inch off to make a 4x7 photo. The smaller accent photos were wallet size and trimmed to 1.5x2.5. When I know I want to use a small photo on a layout I make sure NOT to crop the photo down before printing. After printing I crop the photo manually with my trimmer. That way I still get all of the main image in the finished photo. The opposite is true when I know I want to use a large photo. I do all the cropping digitally before printing. Then my image fills the entire photo without a lot of distraction.

My layout is school themed. We have a lot of great new school themed supplies at Windy City. Some of my supplies are from Maya Road which just arrived in the past few days. Susan posted a few photos yesterday.


Supplies:
Shimmer Patterned Papers by KI Memories
Green Patterned Paper by Cosmo Cricket
Chipboard Apple by Maya Road
Ruler Stamp by Maya Road
Buttons by Creative Cafe
Slick Writer by American Crafts
Micron Pen by Sakura
3/4" Circle Punch by EK Success
StazOn Ink
Glossy Accents by Ranger
Zots by ThermOWeb

Supplies from my personal collection:
Ribbon by KI Memories
Letter Stickers by Basic Grey
Photo Corner stickers by KI Memories
Journal Spot by Heidi Swapp
Letter Stickers by Making Memories

I decided to journal directly onto my photo since there was some dead space in my photo where the journaling is in the sketch. Use a Slick Writer to write directly onto your photo. The results are different and a lot of fun. I also stamped on my photo with StazOn ink to continue the line I started with the ribbon across my page.
For the circle apple accents, I took a circle punch and punched out the little apples from my patterned paper. The 3/4" circle punch worked perfectly! There are some buttons in the Creative Cafe bulk bins that have a center of about 3/4". Just use a Zot to attach your punch outs to the button to create your own embellishments. I have to admit this is a little trick I learned from Melodee Langworthy when she taught at WCS a few months back.

For the apple I just covered the chipboard piece with some red scrap paper. Scraps are great for covering chipboard elements!

My title got a little lost in the patterned background paper. I brought a some focus to it by applying Glossy Accents to the stickers. The results are better in real life than on the scanned image. I love covering letter stickers or letter die cuts with Glossy Accents. It gives it that little something extra to finish the look.

I would love to see what you do with this weeks sketch! Post a link to your layout in the comments. Have a great weekend.

Thursday, September 11, 2008

Look what we have...

I know Alraynita already told you about the goodies we got in this week, but I thought I would post some pictures!


Brand New Ink Pads from
My Mind's Eye!


The Laundry line has paper that is glittered and there are so many NEW embellishments to choose from!


The pictures below are from My Mind's Eye Just Dreamy 2 Collection! Very fun and vibrant colors!


The Halloween Collections from My Mind's Eye are lots of fun! They even have glittered Alphabets to go along with this line. And make sure to check out the packs--they are SUCH a GREAT deal!


And this is a small fraction of the stuff from Maya Road! Cupcakes are everywhere! Owls are everywhere(can someone explain this to me please?!) Rub ons, mini books, chipboard key chain sets, coaster sets, Stamps, RIBBON(my very favorite!) and lots more!


I will take more pictures this weekend and post more things we have put out on the floor!
And don't forget if you are a QT member our meeting is this Sunday at 3:00 pm! We will have a jolly time! Email us if you are coming!


Happy Weekend to you all! Come by and say hello!!
Thanks for looking,
Susan

Tuesday, September 9, 2008

Tuesday Tip * Ribbon Flower accent*

Get out your needle,thread and a strip of ribbon. Let's get started on making a ribbon flower accent. (okay you non sewers..this is a great way to get started. It really is not that hard. If my friend Marie can do it .... you can to.)

Side note: Don't laugh at my non-manicured icky fingers. My poor little hands are constantly in water with having little kids. Between the dishes, dirty diapers and picking up this or that my hands have taken a beating.
Start off by threading your needle and tying a knot at the end of the thread. We will be starting on the top right corner of the ribbon.
Continue stitching up and down the top side of the ribbon.
I tend to use a long needle so I can keep all the ribbon together on the needle. Once I am done I pull the thread through the ribbon but still hold the ribbon cluster together.

To secure the bundle I go back to the last couple of folds and pull the thread through.
Then you end up with a scrunched up piece of ribbon. The next step is to connect the two ends of the ribbon together to make a circle.
There we have our ribbon flower accent. knot the end of the thread and trim off the excess thread.


Then I like to add a brad or button to the middle of the ribbon accent.

Then I like to add the ribbon accent to a flower or chipboard.

This is just a quick and easy way to give your flowers a new look. I know we all have a large stash of flowers and ribbon...why not combine the two.

Enjoy....happy stitching. See you next week. :)Sesil

Monday, September 8, 2008

Tuesday Tip (take two)

Okay.. Sorry I lost the rest of my post last week. So here we go. Take two!


Texture Hammer.


This is a great technique for a small embellishment. You will need aluminum tape (you can find this at your home improvement store), chipboard, chipboard letter or die cut, and texture hammer.

First step is to add your die cut or chipboard letter to the chipboard.
Then add a strip of aluminum tape to the chipboard pieces.
Press around the chipboard letter and smooth out all the tape.

Take texture hammer and pound around the letter. Try not to pound on the letter itself you will loose the height of the embossed letter.

This is my finished result. Notice the smashed part of the top part of the letter.


If you wanted to take it to the next level you could add color using alcohol inks.


I just drop the ink right on top of the embellishment and let it dry. This is what mine looked like.




Final idea.... If you don't have any alcohol inks we still have a storage solution for you stickle fans out there. The Tim Holtz alcohol ink holder. It holds stickles perfectly. Enjoy!


I will be back tomorrow for our regular scheduled Tuesday tip.

:)Sesil